
Using Japanese on a Mac
This site describes how to use Japanese on a Macintosh computer, particularly for people who use a Mac predominantly in English but also want to read, write, browse, and email in Japanese. This front page contains information on activating Japanese support in macOS: start by following the instructions below, then consult the other pages on the site for information on specific tasks and applications: text processing, web browsing, dictionary software, etc.
The instructions below are for Mac OS 15 (Sequoia). But they should work with minor changes for slightly earlier or later systems.
Getting Started: How to Enable Japanese Input in macOS
If you just want to read Japanese on your Mac--receive Japanese email or go to a Japanese web page--the Japanese will display correctly without your doing anything special or reading any further on this page. If this does not work smoothly, if you want to enable additional features, or if you want to input Japanese text (to create documents, do web searches, or send email in Japanese), you'll need to take a couple of extra steps. The instructions on this page are streamlined to get you started quickly with the settings that make it easiest to learn Japanese input. (If you need more detailed instructions, including instructions for an earlier or later system, you can consult Apple's Japanese Input Method User Guide.)
To enable input in Japanese (or other Asian languages), Follow the steps below, or skip to the video at the bottom of this page to see a visual guide.
First, go to System Preferences from the Apple menu, click on the preferences pane labeled Keyboard, look for Input Sources and click Edit. In the next window click on the button marked with a plus sign at the lower left, then select Japanese from the menu. Finally select "Japanese - Romaji" from the options at right and click "Add."
Now you should see Japanese - Romaji in the list of installed input sources at left. When you highlight it, you'll see the different Japanese input preference options. I recommend you set them as follows to start out:
- Check the boxes for hiragana and katakana.
- Uncheck the "Live Conversion" box for now.
- Scroll down a little further in the panel (past the content shown below) and find an option called "Predictive Candidates" it should be unchecked.
If you have a trackpad, you may also want to click on the "+" box one more time, select "Traditional Chinese" or "Simplified Chinese," and choose the "Handwriting" input method. This will let you enter Japanese kanji characters by drawing them on the trackpad, as described elsewhere on this site.
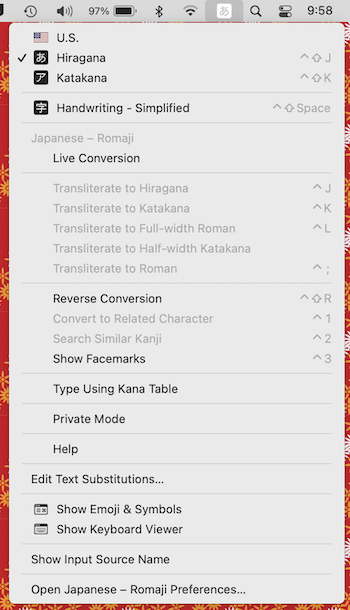
If you now look at the menu bar at the very top of the screen, you should see the icon for the input menu--it probably looks like a box with a roman character A. You can now select Hiragana or Katakana from that menu to enter Japanese text in almost any application. For more on how to enter Japanese text, see the page on Typing in Japanese elsewhere on this site.) If Hiragana or Katakana is already selected as the input method when you click on the input menu, you'll get a longer menu with options specific to Japanese input, including a help option.

The video below summarizes the steps above.
Do I need a Japanese Keyboard?
The short answer is no: the vast majority of users (including native speakers) enter Japanese by typing the pronunciation in roman characters, so you do not need a special Japanese keyboard. If you have a Japanese a keyboard, it will have a slightly different key layout as well as the option of dispensing with roman character input and having each key map to a specific kana character (when you choose the kana input method in the Japanese input preferences). You can sometimes get a Japanese keyboard as an option when you purchase a desktop on Apple's US web site, but it's not necessary for most users.
Next Steps
For a guide to entering text in Japanese, see the page on Typing in Japanese, elsewhere on this site. For an introduction to using Japanese with different applications, see other links in the navigation bar at the top or left of this page.
Optional: Choosing English or Japanese Menus in Applications
If you would like the finder or other applications to display with Japanese menus, go to System Preferences under the Apple menu, then click on General preferences, and then Language & Region.
Find the Applications section near the bottom of the Language & Region preferences, and use the "+" button to add an application to the list. Once an application appears in the list, a pop-up menu lets you select Japanese for the application's default language (if the developers have included Japanese support). This will cause the app's menus to display in Japanese, and may affect some other options in the app as well.
If you want to change the default language for all applications (including the System and Finder), you can go to the Preferred Languages at the top of the Language & Region Preferences. Click on the "+" box to add Japanese to the list of system languages if it does not already appear. Then you can drag Japanese above English in the list, and it will become the preferred system language: the finder and many other applications will open next time with Japanese menus. (Be careful with this: if you can't read Japanese well, you may have trouble navigating your new Japanese Finder well enough set it back easily.)